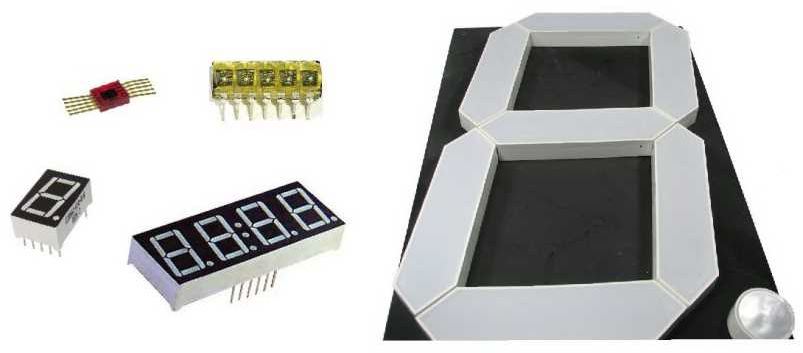
In the lesson we will connect a seven-segment LED display to the Arduino board and learn how to control it using the Led4Digits.h library.
Previous lesson List of lessons Next lesson
In the previous lesson the diagrams of connecting seven-segment LED displays to microcontrollers are described in detail. Let's connect this display to the Arduino board.
I have a typical seven-segment LED display GNQ-3641BUE-21. This is a four-digit display, very bright, glows at low currents. Technical specifications can be viewed in PDF format - GNQ-3641Ax-Bx.pdf.
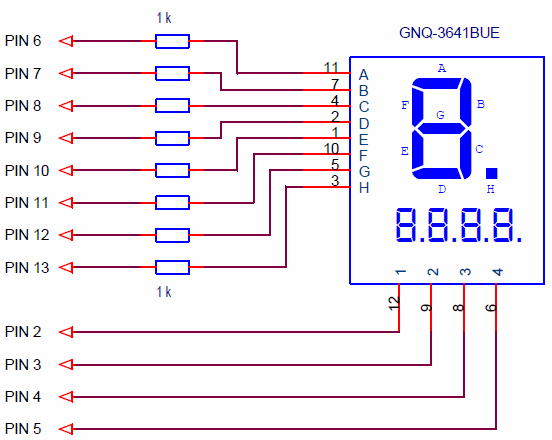
The display connection to the Arduino board looks like this.
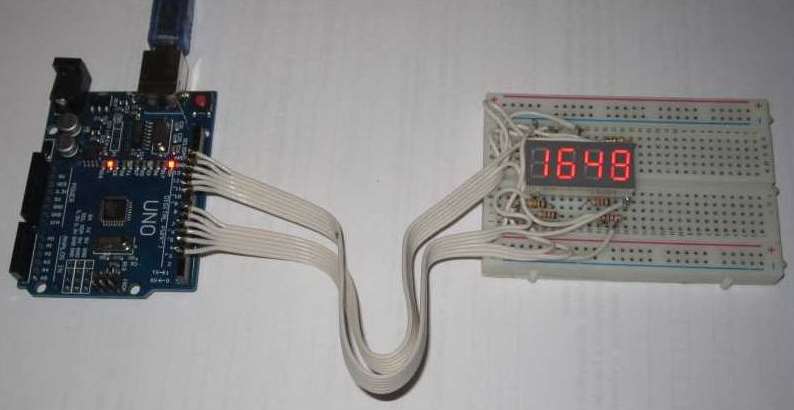
I assembled it on the circuit board.
To control LED displays connected to the Arduino board directly, I developed the Led4Digits.h library.
The library allows you to control seven-segment displays:
- dimension to four digits;
- with any variants of control pulse polarities (all wiring diagrams);
- works in a parallel process;
- allows you to display:
- segments of each digit;
- a number on each digit separately;
- an integer number 0 ... 9999;
- the number of digits can be set to output an integer;
- there is a blancking mode for insignificant digits.
You can download the Led4Digits.h library at this link: Led4Digits.h.
How to install is written in lesson 9.
I will not give the source code. You can see them in the library files. As always, there are enough comments. I will describe in detail, with examples, how to use the library.
LED control library for Arduino Led4Digits.
Here is a description of the class. I resulted only public methods and properties.
class Led4Digits {
public:
byte digit [4]; // codes control the digit segments
void regen (); // regeneration, the method should be called regularly
void tetradToSegCod (byte dig, byte tetrad); // convert tetrad to segment codes
boolean print (unsigned int value, byte digitNum, byte blank); // output an integer
Led4Digits (byte typeLed, byte digitPin0, byte digitPin1, byte digitPin2, byte digitPin3,
byte segPinA, byte segPinB, byte segPinC, byte segPinD,
byte segPinE, byte segPinF, byte segPinG, byte segPinH);
};
Constructor.
Led4Digits (byte typeLed, byte digitPin0, byte digitPin1, byte digitPin2, byte digitPin3,
byte segPinA, byte segPinB, byte segPinC, byte segPinD,
byte segPinE, byte segPinF, byte segPinG, byte segPinH);
typeLed Specifies the polarity of the control pulses for the selection signals of the digits and segments. Supports any wiring diagrams (Lesson 19).
| typeLed | Digits | Segments | Type of circuit |
| 0 | -_- | -_- | Common anode with digit selection switches |
| 1 | _-_ | -_- | Common anode |
| 2 | -_- | _-_ | Common cathode |
| 3 | _-_ | _-_ | Common cathode with digit selection switches |
digitPin0 ... digitPin3 - the digits selection pins. If digitPin = 255, then the digit is disabled. This allows you to connect displays with fewer digits. digitPin0 - low (right) digit.
segPinA ... segPinH - the segments control pins.
For example,
Led4Digits disp (1, 5,4,3,2, 6,7,8,9,10,11,12,13);
means: display type 1; pins for digits 5,4,3,2; segment pins 6,7,8,9,10,11,12,13.
The void regen() method.
The method should be called regularly in a parallel process. It is the regeneration of the image on the display. The cycle time of regeneration is equal to the period of the method call multiplied by the number of digits.
For example,
// interrupt handler 2 ms
void timerInterrupt () {
disp.regen (); // regeneration of the display
}
The byte digit[4] array.
Contains the state of the segments. digit [0] is the low order, the low bit of digit [0] is the segment “A” of the lower digit. A bit state of 1 indicates that the segment is lit.
For example,
digit [1] = B0000101;
means that the segments “A” and “C” are lit in the second digit.
An example of a program that sequentially lights all segments of each digit.
// running segments
#include <MsTimer2.h>
#include <Led4Digits.h>
// the display type 1; digit pins 5,4,3,2; segment pins 6,7,8,9,10,11,12,13
Led4Digits disp(1, 5,4,3,2, 6,7,8,9,10,11,12,13);
void setup() {
MsTimer2::set(2, timerInterrupt); // timer interrupt 2 ms
MsTimer2::start(); // enable interrupt
}
void loop() {
for (int i = 0; i < 32; i++) {
if ( i == 0) disp.digit[0]= 1;
else if ( i == 8) disp.digit[1]= 1;
else if ( i == 16) disp.digit[2]= 1;
else if ( i == 24) disp.digit[3]= 1;
else {
disp.digit[0] = disp.digit[0] << 1;
disp.digit[1] = disp.digit[1] << 1;
disp.digit[2] = disp.digit[2] << 1;
disp.digit[3] = disp.digit[3] << 1;
}
delay(250);
}
}
// interrupt handler 2 ms
void timerInterrupt() {
disp.regen(); // regeneration of the display
}
In the digit[] array, the running 1 is formed and shown on the display.
Method void tetradToSegCod (byte dig, byte tetrad).
The method allows you to display numbers and letters of a hexadecimal code on separate digits. It has arguments:
- dig - digit number 0 ... 3;
- tetrad - decimal code of the symbol. The code 0 will display the digit ”0”, the code 1 - the digit ”1”, the code 14 - the letter ”E”.
For example,
tetrad (2, 7);
will display the number “7” in the third digit.
An example of a program that changes characters in each digit in turn.
// digits in turn
#include <MsTimer2.h>
#include <Led4Digits.h>
// the display type 1; digit pins 5,4,3,2; segment pins 6,7,8,9,10,11,12,13
Led4Digits disp(1, 5,4,3,2, 6,7,8,9,10,11,12,13);
void setup() {
MsTimer2::set(2, timerInterrupt); // timer interrupt 2 ms
MsTimer2::start(); // enable interrupt
}
void loop() {
for (int i = 0; i < 64; i++) {
disp.tetradToSegCod(i>>4, i);
delay(250);
}
}
// interrupt handler 2 ms
void timerInterrupt() {
disp.regen(); // regeneration of the display
}
The boolean print(unsigned int value, byte digitNum, byte blank) method.
The method outs an integer on the display. In it, the binary number is converted to a binary decimal code for each digit. It has arguments:
- value - the number that is displayed.
- digitNum - the number of digits for the displayed number. Do not confuse with the number of digits of the display. You may want to out a number on 2 digits, and on the other two, display the characters using digit[].
- blank - a sign of blanking of insignificant digits. blank = 0 means that the number should be displayed with all zeros. The number “7” will look like “0007”. If the blank is non-zero, then insignificant zeros will be extinguished.
If the value of the number exceeds the permissible for the selected number of digits (digitNum), the function outs "---" on the display and returns false.
An example of the program displaying integers.
// output of integers
#include <MsTimer2.h>
#include <Led4Digits.h>
// the display type 1; digit pins 5,4,3,2; segment pins 6,7,8,9,10,11,12,13
Led4Digits disp(1, 5,4,3,2, 6,7,8,9,10,11,12,13);
void setup() {
MsTimer2::set(2, timerInterrupt); // timer interrupt 2 ms
MsTimer2::start(); // enable interrupt
}
void loop() {
for (int i = 0; i < 12000; i++) {
disp.print(i, 4, 1);
delay(50);
}
}
// interrupt handler 2 ms
void timerInterrupt() {
disp.regen(); // regeneration of the display
}
The last two methods do not change the state of the segment “H” - the decimal point. To change the state of the point, you can use the commands:
digit [0] | = 0x80; // light the decimal point
digit [0] & = 0x7f; // blank the decimal point
The output on the display of negative numbers (int).
The output of negative numbers can be made as follows:
- Check the sign of the number.
- If the number is negative, then print a minus sign on the high-order digit and change the sign of the number to positive in the print() function.
- If the number is positive, then blank the digit for the sign and print the number using the print() function.
Here is a program that demonstrates this method. It displays numbers from -999 to 999.
// output negative numbers
#include <MsTimer2.h>
#include <Led4Digits.h>
// the display type 1; digit pins 5,4,3,2; segment pins 6,7,8,9,10,11,12,13
Led4Digits disp(1, 5,4,3,2, 6,7,8,9,10,11,12,13);
void setup() {
MsTimer2::set(2, timerInterrupt); // timer interrupt 2 ms
MsTimer2::start(); // enable interrupt
}
void loop() {
for (int i = -999; i < 1000; i++) {
if ( i < 0 ) {
// number is negative
disp.digit[3]= B01000000; // sign -
disp.print(i * -1, 3, 1);
}
else {
disp.digit[3]= B00000000; // blank sign
disp.print(i, 3, 1);
}
delay(50);
}
}
// interrupt handler 2 ms
void timerInterrupt() {
disp.regen(); // regeneration of the display
}
The output of fractional numbers, the float format.
There are many ways to display floating-point numbers (float) using standard C functions. This is primarily the sprint() function. It works very slowly, it requires additional conversions of character codes to BCD codes, it is necessary to select a decimal point from a string. With other features the same problems.
I use a different way to output on the display of the values of variables float. The method is simple, reliable, fast. It is reduced to the following operations:
- A floating point number is multiplied by 10 to the degree corresponding to the required number of decimal places. If you need to display 1 decimal place, multiply by 10, if 2, then multiply by 100, 3 characters - by 1000.
- Next, the floating-point number is explicitly converted to an integer (int) and outputed on the display by the print() function.
- The decimal point is set in the desired digit.
For example, the following lines will output on the seven-segment LED display a variable of type float with two decimal places.
float x = 2.12345;
disp.print ((int) (x * 100.), 4, 1);
disp.digit [2] | = 0x80; // light the decimal point of the third digit
We multiply the number by 100, and we divide the result by 100 by putting the point in the third digit.
Here is a program that displays floating point numbers from 0.00 to 99.99.
// output floating point numbers
#include <MsTimer2.h>
#include <Led4Digits.h>
// the display type 1; digit pins 5,4,3,2; segment pins 6,7,8,9,10,11,12,13
Led4Digits disp(1, 5,4,3,2, 6,7,8,9,10,11,12,13);
void setup() {
MsTimer2::set(2, timerInterrupt); // timer interrupt 2 ms
MsTimer2::start(); // enable interrupt
}
void loop() {
float x = 0;
for (int i = 0; i < 10000; i++) {
x += 0.01;
disp.print((int)(x * 100.), 4, 1);
disp.digit[2] |= 0x80; // light the decimal point of the third digit
delay(50);
}
}
// interrupt handler 2 ms
void timerInterrupt() {
disp.regen(); // regeneration of the display
}
As you can see, the Led4Digits.h library greatly simplifies working with seven-segment LED displays connected to the Arduino board. I did not find an analogue of such a library.
There are libraries for working with LED displays through a shift register. Someone wrote to me that he had found a library working with a LED display directly connected to the Arduino board. But when it is used, the display digits glow unevenly and wink.
Unlike analogs the Led4Digits.h library:
- Works as a parallel process. In the main loop, the program loads data into certain variables, which are automatically outputted on the display. Information output and regeneration of the display occur in a timer interrupt, insensibly to the main program.
- The display digits glow evenly, without blinking. This property is ensured by the fact that regeneration occurs in a cycle strictly defined by a timer interrupt.
- The library has a compact code, runs quickly, minimally loads the controller.
In the next lesson, we will connect an LED dis[lay and a matrix of buttons to the Arduino board simultaneously. We will write a library for this structure.


