In the lesson we will talk about character LCD displays, about connecting them to the Arduino board and controlling them using the LiquidCrystal library.
Previous lesson List of lessons Next lesson
Although seven-segment LED displays are the cheapest display option for electronic devices, their use is limited by two significant drawbacks.
- It is almost difficult to connect more than 8 digits of LED displays to the microcontroller. A large number of pins is required, the displays have significant consumption currents, complex keys are required, low regeneration frequency, etc.
- It is not possible to display character information.
To display textual information or numbers larger than 4 digits, it is much more practical to use liquid crystal character displays. Their advantages include:
- convenient interface for connecting to microcontrollers;
- low power consumption;
- low supply voltage;
- durability.
There are a large number of various LCD displays from different manufacturers. Almost all of them are similar in parameters, interface signals, control commands. Currently, the most common LCD are devices manufactured by Winstar, Taiwan. I will refer to the displays of this company. But the information is quite applicable to character LCD displays from other manufacturers.
General information.
Character LCD display information in the form of character cells of a certain capacity. One character cell displays one character. The number of cells determines the digit capacity of the display. Information can be displayed on several lines, therefore, for displays of this type, the number of characters in a line and the number of lines are always specified.
Information is displayed on a liquid crystal matrix with LED backlight. The backlight comes in a variety of colors, which greatly enlivens monochrome text information.
The BUILT-in HD44780 controller or its full analogues are used to control the liquid crystal matrix and organize the interface. This controller determines the interface signals of the display and control commands.
HD44780 has become the de facto standard for character LCD displays. Technical documentation for the HD44780 controller in PDF format can be viewed at this link - HD44780.pdf. Maybe someone will like the documentation of one of the analogues of this controller - SPLC780D. PDF Link - SPLC780.pdf.
Character LCD displays of Winstar company.
I know the following options LCD displays of this company.
| Display type | Display format, characters x lines | Dimensions, mm | Dimensions of the visible area, mm | Reference to the documentation, PDF format |
| WH0802A1 | 8 x 2 | 58 x 32 | 38 x 16 | |
| WH1202A | 12 x 2 | 55,7 x 32 | 46 x 14,5 | |
| WH1601A | 16 x 1 | 80 x 36 | 66 x 16 | |
| WH1601B | 16 x 1 | 85 x 28 | 66 x 16 | |
| WH1601L | 16 x 1 | 122 x 33 | 99 x 13 | |
| WH1602A | 16 x 2 | 84 x 44 | 66 x 16 | |
| WH1602B | 16 x 2 | 80 x 36 | 66 x 16 | |
| WH1602C | 16 x 2 | 80 x 36 | 66 x 16 | |
| WH1602D | 16 x 2 | 85 x 30 | 66 x 16 | |
| WH1602J | 16 x 2 | 80 x 36 | 66 x 16 | |
| WH1602L1 | 16 x 2 | 122 x 44 | 99 x 24 | |
| WH1602M | 16 x 2 | 85 x 32,6 | 66 x 16 | |
| WH1602O | 16 x 2 | 85 x 25,2 | 66 x 16 | |
| WH1602P | 16 x 2 | 85 x 25,2 | 66 x 16 | |
| WH1602S | 16 x 2 | 59 x 29,3 | 52 x 15 | |
| WH1602T | 16 x 2 | 65,4 x 28,2 | 54,8 x 19 | |
| WH1602W | 16 x 2 | 80 x 36 | 66 x 16 | |
| WH1602V2 | 16 x 2 | 66,7 x 23,3 | 61 x 15,9 | |
| WH1604A | 16 x 4 | 87 x 60 | 62 x 26 | |
| WH1604B | 16 x 4 | 70,6 x 60 | 60 x 32,6 | |
| WH2002A | 20 x 2 | 116 x 37 | 85 x 18,6 | |
| WH2002D | 20 x 2 | 89 x 21,5 | 75 x 15 | |
| WH2002L | 20 x 2 | 180 x 40 | 149 x 23 | |
| WH2002M | 20 x 2 | 146 x 43 | 123 x 23 | |
| WH2004A | 20 x 4 | 98 x 60 | 77 x 25,2 | |
| WH2004B | 20 x 4 | 98 x 60 | 77 x 25,2 | |
| WH2004D | 20 x 4 | 77 x 47 | 60 x 22 | |
| WH2004G | 20 x 4 | 87 x 58 | 74,4 x 24,8 | |
| WH2004H | 20 x 4 | 87 x 58 | 74,4 x 24,8 | |
| WH2004L | 20 x 4 | 146 x 62,5 | 123,5 x 43 | |
| WH2402A | 24 x 2 | 118 x 36 | 94,5 x 16 | |
| WH4002A | 40 x 2 | 182 x 33,5 | 154,4 x 16,5 | |
| WH4004A | 40 x 4 | 190 x 54 | 147 x 29,5 |
Connecting the LCD to the microcontroller.
Connection diagrams, timing diagrams, signal parameters, control commands, character codes are detailed in the documentation for the HD44780 controller. I will give only the most necessary data on the connection of LCD displays to microcontrollers.
As a rule, a character LCD display have 16 pins.
| Pin number | Signal | I - input O - output | Signal assignment |
| 1 | Vss | - | Ground |
| 2 | Vdd | - | Power + 5 V |
| 3 | Vo | - | Contrast Adjustment. Controls the display contrast. Input to connect the average output of the voltage divider + 5 V. You can use a trimming resistor resistance of 10-20 ohms. |
| 4 | RS | I | Register selection: 0 - instruction register; 1 - data register. A low signal level means that a command has been formed on the data bus, a high level means that there is data on the bus. |
| 5 | R/W | I | Data direction:
0 – writing; 1 – reading. Many applications do not use the read function, so the signal is often connected to signal ground. |
| 6 | E | I | Enable signal. |
| 7 | DB0 | I/O | Data bus line. Lower bits of eight bit mode. When the four-bit interface is not used. |
| 8 | DB1 | I/O | |
| 9 | DB2 | I/O | |
| 10 | DB3 | I/O | |
| 11 | DB4 | I/O | Data bus line. The high bits of the eight bit mode or the data bits of the four bit interface. |
| 12 | DB5 | I/O | |
| 13 | DB6 | I/O | |
| 14 | DB7 | I/O | |
| 15 | A | - | Backlight power anode (+). |
| 16 | K | - | Backlight power cathode (-). The current must be limited. |
Pin numbers (first column) are given for the most common variant. Better check by downloading the documentation for your display type from the table of the previous section.
Character LCD displays support two connection options to the microcontroller:
- Using 8-bit data bus. All DB0-DB7 bus signals are connected. A byte of information is transmitted in one data processing cycle.
- Using a 4-bit data bus. Only 4 higher DB4-DB7 digits are connected. Information is transmitted four bits per bus clock cycle.
The first option provides data transfer to the display at a higher speed. The second – requires to connect the display to the 4 pins less. Undoubtedly, it is more important to reduce the number of pins to connect than to increase the speed. Moreover, the LCD displays are rather slow devices with a regeneration cycle time of 10-20 ms.
Connecting a character LCD to the Arduino board.
I will connect the WH2004A display (4 lines of 20 characters) in a four-bit data exchange mode to the Arduino UNO R3 board. Documentation on the WH2004 LCD display can be viewed at this link WH2004.pdf.
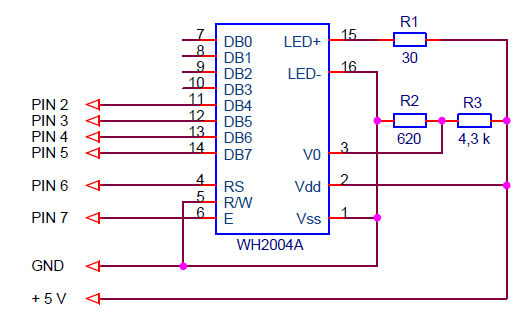
The schematic diagram looks like this.
Resistors R2 and R3 determine the contrast of the display. You can connect a trim resistor and set the desired image clarity. I often use the WH2004, and in my circuits I choose such resistor values.
I connected the LEDs of the LCD backlight to the 5 V power supply through a resistor R1 (30 Ohm). With this, I set a current of about 25 mA. Dim, but glows. In the dark you can see well. Although the WH2004 indicators allow the backlight current to 580 mA.
LiquidCrystal - a library for controlling LCD displays in the Arduino system.
There is a standard library for controlling LCD displays based on the HD44780 controller. I will describe her methods in detail.
LiquidCristal (...)
Class constructor Can have different number of arguments.
- LiquidCristal (rs, en, d4, d5, d6, d7) - four-bit interface, the RW signal is not used (connected to ground).
- LiquidCristal (rs, rw, en, d4, d5, d6, d7) - four-bit interface, the RW signal is used.
- LiquidCristal (rs, en, d0, d1, d2, d3, d4, d5, d6, d7) - eight-bit interface, the RW signal is not used (connected to ground).
- LiquidCristal (rs, rw, en, d0, d1, d2, d3, d4, d5, d6, d7) - eight-bit interface, the RW signal is used.
Arguments:
- rs – pin number of RS signal;
- rw – pin number of RW signal;
- en - pin number of E signal;
- d0, d1, d2, d3, d4, d5, d6, d7 – data bus pin numbers.
LiquidCrystal disp(6, 7, 2, 3, 4, 5);
void begin (cols, rows)
Initializes the display interface. Sets the dimension of the screen. The method must be called first, before using other functions of the class.
Arguments:
- cols - number of characters per line;
- rows - number of rows.
disp.begin (20, 4); // use the display - 4 lines of 20 characters
void clear ()
Cleaning the screen, setting the cursor in the upper left corner.
disp.clear (); // reset the display
void home ()
Placing the cursor in the upper left corner.
disp.home (); // to the beginning of the screen
void setCursor (col, row)
Sets the cursor to the specified position.
- col - X coordinate, numbering from 0;
- row - Y coordinate, numbered from 0.
setCursor (0,1); // cursor to the beginning of the second line
byte write (data)
Displays a character on the screen. Returns the number of bytes transferred.
The next sketch displays the data from the serial port. Data can be transmitted by the Arduino IDE port monitor.
// output serial data to LCD
#include <LiquidCrystal.h>
LiquidCrystal disp(6, 7, 2, 3, 4, 5); // create an object
char data;
void setup()
{
Serial.begin(9600); // initialize serial port
disp.begin(20, 4); // initialize the display 4 lines of 20 characters
}
void loop()
{
if (Serial.available()) { // if there is data
data= Serial.read(); // read the character
if( (data != 0xd) && (data != 0xa) ) { // line feed
disp.write(data); // display the character
}
}
}
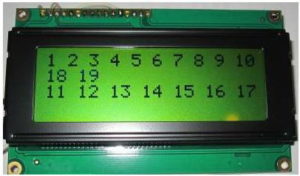
My display is large - 4 lines of 20 characters each. It has two HD44780 controllers installed. Therefore, consecutively transmitted characters first fill the first line, then the third, then the second and fourth. Those. through a line. It is necessary to take into account this property for certain types of displays. The documentation for each LCD indicates the character addressing sequence.
byte print (data)
Displays text. Returns the number of bytes transferred.
The function has various forms of calling for different formats and data types.
| print(char d) | If the argument of type char prints the character
char d = 83; |
| print(int d) | If the argument is an integer type, then displays a string with a decimal number
int d = 83; |
| print(float) | Real types are output with ASCII characters, two decimal places
float d= 7.65432; |
| print(* str) | If the argument is a pointer to a string, then a text string is output.
char letters [3] = {65, 66, 67}; |
| print(int d, DEC) | Displays the ASCII string, the decimal representation of the number
int d= 83; |
| print(int d, HEX) | Displays an ASCII string — a hexadecimal representation of a number.
int d = 83; |
| print(int d, OCT) | Displays the ASCII string - the octal number representation
int d = 83; |
| print(int d, BIN) | Displays an ASCII string — the binary representation of a number.
int d = 83; |
| print(float d, N) | For real numbers, the parameter N sets the number of digits after the decimal point.
disp.print (7.65432, 0); // displays the string “7” |
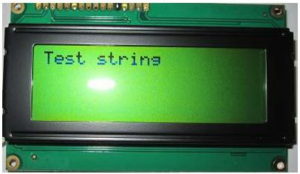
An example of a program that prints a text string on the display.
// display a text string on the LCD
#include <LiquidCrystal.h>
LiquidCrystal disp(6, 7, 2, 3, 4, 5); // create an object
void setup()
{
disp.begin(20, 4); // initialize the display 4 lines of 20 characters
disp.print("Test string");
}
void loop()
{ }
void cursor ()
Enables the cursor display mode. The position where the next character will be displayed is underlined.
disp.cursor (); // enable cursor display
void noCursor ()
Disables the display of the cursor.
disp.noCursor (); // disallow the display of the cursor
void blink ()
Enables the flashing cursor mode. Used with the cursor () function. The result depends on the specific display model.
disp.blink (); // enable the blinking cursor
void noBlink ()
Disables the blinking cursor mode.
disp.noBlink (); // disable the blinking cursor
void display ()
Enables the screen after it has been disabled by the noDisplay () function. The screen displays information that was before shutdown.
disp.display (); // enable the display
void noDisplay ()
Disables the screen. Information is stored in memory and appears when the display is enabled.
disp.noDisplay (); // disable the display
void scrollDisplayLeft ()
Scrolls the display content one character to the left.
disp. scrollDisplayLeft (); // move everything to the left
void scrollDisplayRight ()
Scrolls the display content one character to the right.
disp. scrollDisplayRight (); // move everything to the right
void autoscroll ()
Enable automatic text scrolling. When displaying each character, all text on the screen will move one character. In which direction the information is shifted is determined by the functions leftToRight () and rightToLeft ().
disp. autoscroll () (); // turn on autoscroll
void noAutoscroll ()
Disables automatic scrolling text.
disp. noAutoscroll (); // disallow autoscrolling
void leftToRight ()
Sets the text display mode from left to right. New characters will appear to the right of the previous ones.
leftToRight (); // left-to-right mode
void rightToLeft ()
Sets the text output mode from right to left. New characters will appear to the left of the previous ones.
rightToLeft (); // right-to-left mode
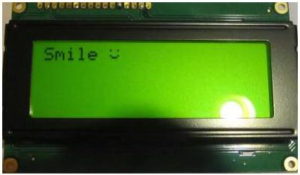
void createChar (num, data)
Method to create a custom character. The controller allows the creation of up to 8 characters (0 ... 7) with a size of 5x8 pixels. The symbol image is specified by an array of 8 bytes.
The 5 least bits of each byte determine the state of the row pixels.
To output a custom character, you can use the write () function with the character number.
// create a custom character
#include <LiquidCrystal.h>
LiquidCrystal disp(6, 7, 2, 3, 4, 5); // create an object
byte smile[8] = {
B00000000,
B00010001,
B00000000,
B00000000,
B00010001,
B00001110,
B00000000,
B00000000
};
void setup()
{
disp.createChar(0, smile); // create character
disp.begin(20, 4); // initialize the display 4 lines of 20 characters
disp.print("Smile ");
disp.write(byte(0)); // print the character
}
void loop()
{ }
Display of national alphabets.
I will tell about the solution of this problem on the example of Cyrillic.
Most LCD displays on the Russian market support Cyrillic characters, but the codes of these characters do not comply with the ASCII standard. Therefore, a complete rubbish is displayed.
The first way out is to set the characters with their correct codes in an explicit form. Codes can be found in the documentation for the HD44780 controller.
For example, character codes:
- А- 41h;
- Б – a0h;
- В – 42h;
- Г – a1h.
Here is a program that displays the Cyrillic characters “АБВГ” in this way.
// Cyrillic output using character codes
#include <LiquidCrystal.h>
LiquidCrystal disp(6, 7, 2, 3, 4, 5); // create an objec
void setup()
{
disp.begin(20, 4); // initialize the display 4 lines of 20 characters
disp.print("\x41\xa0\x42\xa1");
}
void loop()
{ }
Not very convenient, but if the characters are few, it is quite acceptable. There are programs that translate Cyrillic text into codes.
Library with Cyrillic support LiquidCrystalRus.
A practical option for displaying text in Russian is to use the LiquidCrystalRus library. You can download it at this link LiquidCrystalRus-1.6.0.zip.
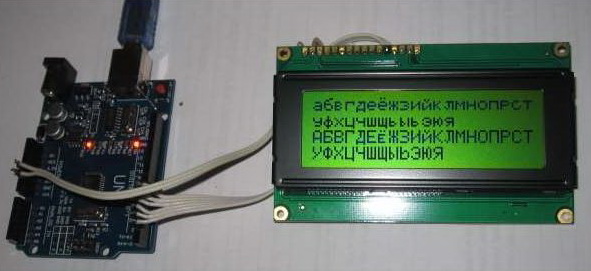
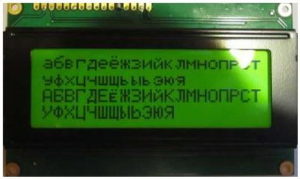
Here is an example of a program that displays the Russian alphabet.
// display the Russian alphabet
#include <LiquidCrystalRus.h>
LiquidCrystalRus disp(6, 7, 2, 3, 4, 5); // create an object
void setup()
{
disp.begin(20, 4); // initialize the display 4 lines of 20 characters
disp.print("абвгдеёжзийклмнопрст");
disp.print("АБВГДЕЁЖЗИЙКЛМНОПРСТ");
disp.print("уфхцчшщьыьэюя ");
disp.print("УФХЦЧШЩЫЬЭЮЯ ");
}
void loop()
{ }
There are two HD44780 controllers in my display. Therefore, the display through the line and I had to break the sequence of output lines in the program.
As you can see, working with character LCD displays is much easier than it seems.


