In this lesson, we'll consider buttons as objects, create a class for them.
Previous lesson List of lessons Next lesson
In the last lesson, we wrote a working, debugged program block that can be fully used in real programs. But the result happened not quite smart.
- The program unit for signal processing is placed together with other blocks and degrades the readability of the program.
- It is necessary to define variables for it, to forget nothing.
- And if we need to connect several buttons. For each of them it is necessary to create their own variables, their program blocks, their functions. And nothing to mix up.
- With each use of the software signal processing unit, we will have to remember how it works, what variables it requires and, most importantly, change the variable names in the block text.
And this is despite the fact that we use the same simple object - the button. For a smart solution to these problems, there are classes in the Arduino programming language.
Classes in C ++ for Arduino.
Classes allow the programmer to create new types of objects. They consist of properties and methods. Properties are data that can be used to characterize a class object. Methods are functions that can perform actions on class properties.
- Class properties are its variables.
- Class methods are its functions.
The class definition looks like this:
class class_name {class members};
Members of a class are variables, functions, other classes, and so on.
Creating a class for handling button signals.
Let's create a class for our button object. Let's call it Button.
We need the same variables as in the previous lesson, only they become properties of the class. Let me remind you that then we created the following variables:
boolean flagPress = false; // flag - the button is pressed
boolean flagClick = false; // flag - the button was clicked
byte buttonCount = 0; // counter of button state acknowledgments
#define TIME_BUTTON 15 // stable state time (* 2 ms)
To these variables, it is necessary to add the pin number to which the button is connected, and the TIME_BUTTON constant must be declared as a variable so that you can specify your acknowledg time for each button.
Let's issue the listed variables as class properties.
// Description of the button signal processing class
class Button {
boolean flagPress; // flag - the button is pressed
boolean flagClick; // flag - the button was clicked
byte buttonCount; // counter of button state acknowledgments
byte timeButton; // time of button state acknowledgments
byte _pin; // pin number
};
Button is the name of the class, and its properties (variables) are listed in curly brackets.
Access modifiers: private and public.
All properties and methods of the class have access rights. For example, the counter buttonCount is used only by the class itself for its own calculations. Other software modules will never contact it. It is logical to deny access to all functions except the methods of own Button class.
For this, there are private and public modifiers in C ++.
- Functions and variables that are after the public modifier are available from anywhere in the program.
- Private modifiers and variables are placed after the private modifier. Only methods of their own class can work with them. If there is no modifier public, then all members of the class are considered private.
We need to choose which variables (properties) to make open, and which ones to be private. A good style of object-oriented programming assumes that all variables must be private. A call to them occurs through the methods (functions) of the class. But we need to make an amendment to the fact that we are writing a program for a microcontroller with limited performance. A call to any function takes time. Therefore, the properties to which the program accesses often can be made open and refer to them directly. This will reduce the execution time of the program.
In our case, these are the flagPress and flagClick flags. They are constantly contacted by a program for monitoring the status of buttons. And the number of pin (_pin) and the timeout (timeButton) are usually set only once. Let's make these variables private. We will install them using an additional method.
In view of the above, our class will look like this.
// Description of the button signal processing class
class Button {
public:
boolean flagPress; // flag - the button is pressed
boolean flagClick; // flag - the button was clicked
private:
byte _buttonCount; // counter of button state acknowledgments
byte _timeButton; // time of button state acknowledgments
byte _pin; // pin number
};
Variables timeButton and pin we have to declare as arguments of the method for setting the values. So we added _ before the names to distinguish the method arguments and the class variables.
The class we have created so far consists only of properties. It is necessary to add to it methods-functions.
We need a method for checking the state of the button's signal, the same one that we called in the loop every 2 milliseconds. Let's сall it scanState (status scanning).
It is accepted to write the names of classes in a mixed register, starting with a capital letter, and the names of methods - in a mixed register, starting with a lowercase letter, the first part - a verb.
Because variables - pin number and acknowledg time, we made closed, then the function of setting their values is necessary. For example, setPinTime.
Those. For the Button class, two methods are needed. After adding methods, our class will look like this.
// Description of the button signal processing class
class Button {
public:
boolean flagPress; // flag - the button is pressed
boolean flagClick; // flag - the button was clicked
void scanState(); // method for checking the signal state
void setPinTime(byte pin, byte timeButton); // method of setting the pin number and time of acknowledgments
private:
byte _buttonCount; // counter of button state acknowledgments
byte _timeButton; // time of button state acknowledgments
byte _pin; // pin number
};
The void scanState() method has no arguments and returns nothing. The void setPinTime (byte pin, byte timeButton) method does not return anything and has two arguments: the pin number and the time to acknowledg the button's stable state.
So we declared the class. It remains to write the method codes. Because methods are functions, then the codes for them are formalized as functions. You can write codes right inside the class, but this will result in poor readability of the program text. Imagine that at the beginning of the program, where variables, classes are described, there will be huge blocks of codes. Therefore, it is better to write method codes at the end of the program. The difference between the methods of classes from user functions is only that in the first case it is necessary to specify the method's belonging to a particular class.
void Button::scanState() {
// method code
}
Button:: means that the scanState() function is a method of the Button class.
Let's write the scanState() method code.
// method for checking the status of the button
// flagPress = true - pressed
// flagPress = false - free
// flagClick = true - was clicked
void Button::scanState() {
if ( flagPress == (! digitalRead (_pin)) ) {
// signal state remains the same
_buttonCount = 0; // reset the counter of acknowledgments
}
else {
// signal state changed
_buttonCount ++; // +1 to the counter of acknowledgments
if ( _buttonCount >= _timeButton ) {
// signal state did not change for the specified time
// the signal state became stable
flagPress = ! flagPress; // inversion of the state sign
_buttonCount = 0; // reset the counter of acknowledgments
if (flagPress == true ) flagClick = true; // sign of click
}
}
}
It repeats the code from the previous lesson, only as variables, the properties of the class are used.
Now the code for the setPinTime method (byte pin, byte timeButton). It's quite simple. It overloads the method arguments in the private properties of the class and sets the pin mode.
// method of setting the pin number and time of button state acknowledgments
void Button::setPinTime (byte pin, byte timeButton) {
_pin = pin;
_timeButton = timeButton;
pinMode(_pin, INPUT_PULLUP); // set pin as input
}
We have completed the creation of the Button class. It remains to learn how to use it.
A class is only a description of the type of object, the object itself is not yet. It must be created. This is done in the same way as declaration of variables when using built-in data types.
int x; // we created a variable of type int with the name x
Button button1; // we created a Button object named button1
Button buttonPlus; // we created another Button object named buttonPlus
You realized that now you can add a new button to the system in one line.
To access class members from anywhere in the program, you must use the object name, the point, and the name of the property or method.
button1.flagClick = false; // variable flagClick of object button1 = false
button1.scanState(); // call the scanState() method of object button1
button1.setPinTime(12, 20); // call the setPinTime() method of object button1 with parameters 12, 20
Checking the status of button1 from anywhere in the program will look like this:
if ( button1.flagPress == true ) {
// the button is pressed
}
I think now nothing needs to be explained in the program. (sketch_7_1)
// Sketch_7_1 lesson 7
// Each press of the button changes the status of the LED
#define LED_PIN 13 // the LED is connected to pin 13
#define BUTTON_PIN 12 // button is connected to pin 12
// Description of the button signal processing class
class Button {
public:
boolean flagPress; // flag - the button is pressed
boolean flagClick; // flag - the button was clicked
void scanState(); // method for checking the signal state
void setPinTime(byte pin, byte timeButton); // method of setting the pin number and time (number) of state acknowledgments
private:
byte _buttonCount; // counter of button state acknowledgments
byte _timeButton; // time of button state acknowledgments
byte _pin; // pin number
};
boolean ledState; // LED state variable
Button button1; // create a Button object named button1
void setup() {
pinMode(LED_PIN, OUTPUT); // set pin 13 (LED) as output
button1.setPinTime (BUTTON_PIN, 15); // call the method for setting the button1 object with the parameters: pin number 12, the number of acknowledgments 15
}
// an infinite loop with a period of 2 ms
void loop () {
button1.scanState(); // call the method of scanning the button signal
// LED control unit
if ( button1.flagClick == true ) {
// there was a click of a button
button1.flagClick = false; // reset the click flag
ledState = ! ledState; // inversion of the LED state
digitalWrite(LED_PIN, ledState); // output the LED status
}
delay(2); // 2 ms delay
}
// method for checking the status of the button
// flagPress = true - pressed
// flagPress = false - free
// flagClick = true - was clicked
void Button::scanState() {
if (flagPress == (! digitalRead (_pin)) ) {
// signal state remains the same
_buttonCount = 0; // reset counter of acknowledgments
}
else {
// signal state changed
_buttonCount++; // +1 to the acknowledg counter
if ( _buttonCount >= _timeButton ) {
// signal state did not change for the specified time
// the signal state became stable
flagPress = ! flagPress; // inversion of the state sign
_buttonCount = 0; // reset the counter of acknowledgments
if ( flagPress == true ) flagClick = true; // sign of click
}
}
}
// method of setting the output number and time of acknowledgments
void Button::setPinTime(byte pin, byte timeButton) {
_pin = pin;
_timeButton = timeButton;
pinMode(_pin, INPUT_PULLUP); // set pin as input
}
Download, check. It works for me.
Class constructors in the programs Arduino.
Class constructors are functions that are automatically called when an object of this class is created.
- The constructor is a member of the class;
- does not have a return type, even void;
- has the same name as the class.
In our Button class, we can create a constructor in order not to make an extra call to setPinTime method (12, 15). The parameters could be set when the button1 object is created.
To do this, add a description of the constructor to the class description.
Button (byte pin, byte timeButton); // description of the constructor
And at the end of the program, we'll write the constructor code very similar to the setPinTime method.
// description of the Button class constructor
Button::Button (byte pin, byte timeButton) {
_pin = pin;
_timeButton = timeButton;
pinMode(_pin, INPUT_PULLUP); // define pin as input
}
Now we can set the parameters pin and timeButton when creating the object.
Button button1(BUTTON_1_PIN, 15); // create an object for button 1 with parameters BUTTON_1_PIN and 15
We do not need to use the setPinTime method. Although it is better to leave it so that the program can change the parameters after the object is created.
Full version of the code of the program with the constructor in the next section.
Let's check the work of the program with two objects (buttons).
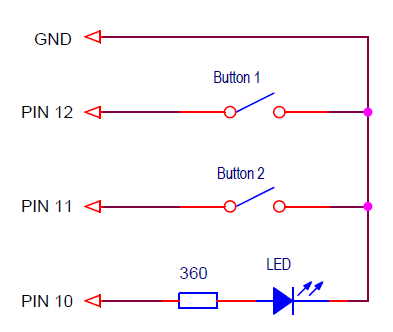
Add to the circuit one more button and one LED. We connect them to the Arduino board according to the scheme.
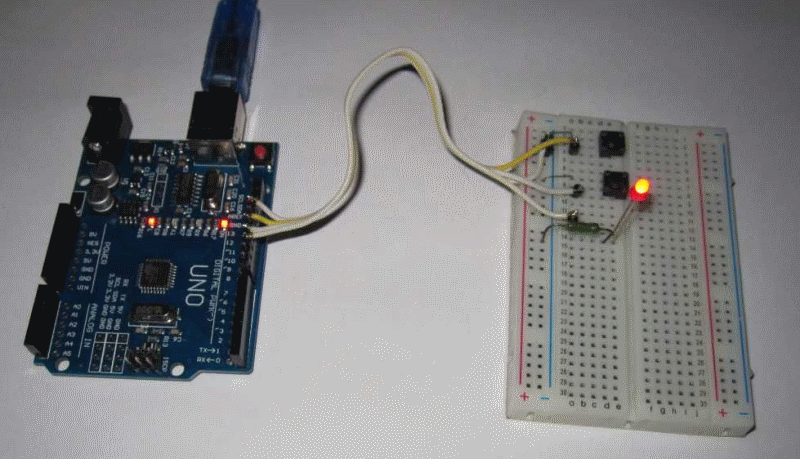
At me all this looks so.
The first button changes the LED status on the Arduino board, and the second one - the LED on the breadboard.
- We create two button1 and button2 objects in the program using the constructor parameters.
- In an infinite loop, we call scanState methods for both objects.
- In an infinite loop, we check the flags of both objects and control the LED.
Here is the text of the program. (sketch_7_2)
// Lesson 7 sketch_7_2 program
// Two buttons and LED
// Each press of button 1 inverts the status of the LED on the Arduino board
// Each press of button 2 inverts the status of the LED on the breadboard
#define LED_1_PIN 13 // LED1 is connected to pin 13
#define BUTTON_1_PIN 12 // button1 is connected to pin 12
#define BUTTON_2_PIN 11 // button2 is connected to pin 11
#define LED_2_PIN 10 // LED2 is connected to pin 10
// Description of the button signal processing class
class Button {
public:
Button (byte pin, byte timeButton); // description of the constructor
boolean flagPress; // flag - the button is pressed
boolean flagClick; // flag - the button was clicked
void scanState(); // method for checking the signal state
void setPinTime(byte pin, byte timeButton); // method of setting the pin number and time (number) of state acknowledgments
private:
byte _buttonCount; // counter of button state acknowledgments
byte _timeButton; // time of button state acknowledgments
byte _pin; // pin number
};
boolean ledState1; // LED1 state variable
boolean ledState2; // LED2 state variable
Button button1(BUTTON_1_PIN, 15); // create an object for button 1
Button button2(BUTTON_2_PIN, 15); // create an object for button 2
void setup() {
pinMode(LED_1_PIN, OUTPUT); // define pin of LED1 as output
pinMode(LED_2_PIN, OUTPUT); // define pin of LED2 as output
}
// an infinite loop with a period of 2 ms
void loop() {
button1.scanState (); // call the method of scanning button1 signal
button2.scanState (); // call the method of scanning button2 signal
// LED1 control unit
if (button1.flagClick == true) {
// there was a click of button
button1.flagClick = false; // reset the click flag
ledState1 = ! ledState1; // inversion of LED1 status
digitalWrite(LED_1_PIN, ledState1); // output the status of the LED1
}
// LED2 control unit
if (button2.flagClick == true) {
// there was a click of button
button2.flagClick = false; // reset the click flag
ledState2 = ! ledState2; // inversion of LED2 status
digitalWrite(LED_2_PIN, ledState2); // output the status of the LED2
}
delay(2); // 2 ms delay
}
// method for checking the status of the button
// flagPress = true - pressed
// flagPress = false - free
// flagClick = true - was clicked
void Button::scanState() {
if ( flagPress == (! digitalRead(_pin)) ) {
// signal state remains the same
_buttonCount= 0; // reset counter of acknowledgments
}
else {
// signal state changed
_buttonCount++; // +1 to the acknowledg counter
if ( _buttonCount >= _timeButton ) {
// signal state did not change for the specified time
// the signal state became stable
flagPress = ! flagPress; // inversion of the state sign
_buttonCount = 0; // reset the counter of acknowledgments
if (flagPress == true) flagClick = true; // sign of click
}
}
}
// method of setting the pin number and time of acknowledgments
void Button::setPinTime(byte pin, byte timeButton) {
_pin = pin;
_timeButton = timeButton;
pinMode(_pin, INPUT_PULLUP); // set pin as input
}
// description of the Button class constructor
Button::Button(byte pin, byte timeButton) {
_pin = pin;
_timeButton = timeButton;
pinMode(_pin, INPUT_PULLUP); // set pin as input
}
Download to the board. Everything is working.
In the next lesson, I'll talk about another method for processing a button signal, and we'll create a new method for it.


In order to make computerese understandable to a newbie (like myself) AVOID “descriptions” which DON’T describe such as
“Members of a class are variables, functions, other classes, and so on.”
Think about it. According to your description “Members of a class”
can be “other classes” is like defining sulfur as a material that contains sulfur !
As a member of a class, another class can be used.
It is difficult to find you a life example. Obviously, programming is something very different from our world.
Maybe, “this huge brick consists of concrete, iron reinforcement and bricks”.